Thursday, September 1, 2016

Fool Me Twice--Shame On Me

Have you ever done anything that you think "OMG I can't believe I did that"? I know that I certainly have. And being the optimistic 'cup half full' person that I am, I then wonder what I could've done so it wouldn't have happened. 

Simple example would be when I hand sew (think sewing on binding). I've had just a few more inches to sew but my thread is extremely short. I know I can make it so I take those few final stitches. Then my thread is so short I can't make a good strong knot. My fault and I know better. Rather than aggravate myself with the outcome, when my thread starts to get short, I knot off right then and there. Then I re-thread my needle and pick up where I left off. It only takes a couple extra minutes, but it helps my blood pressure.

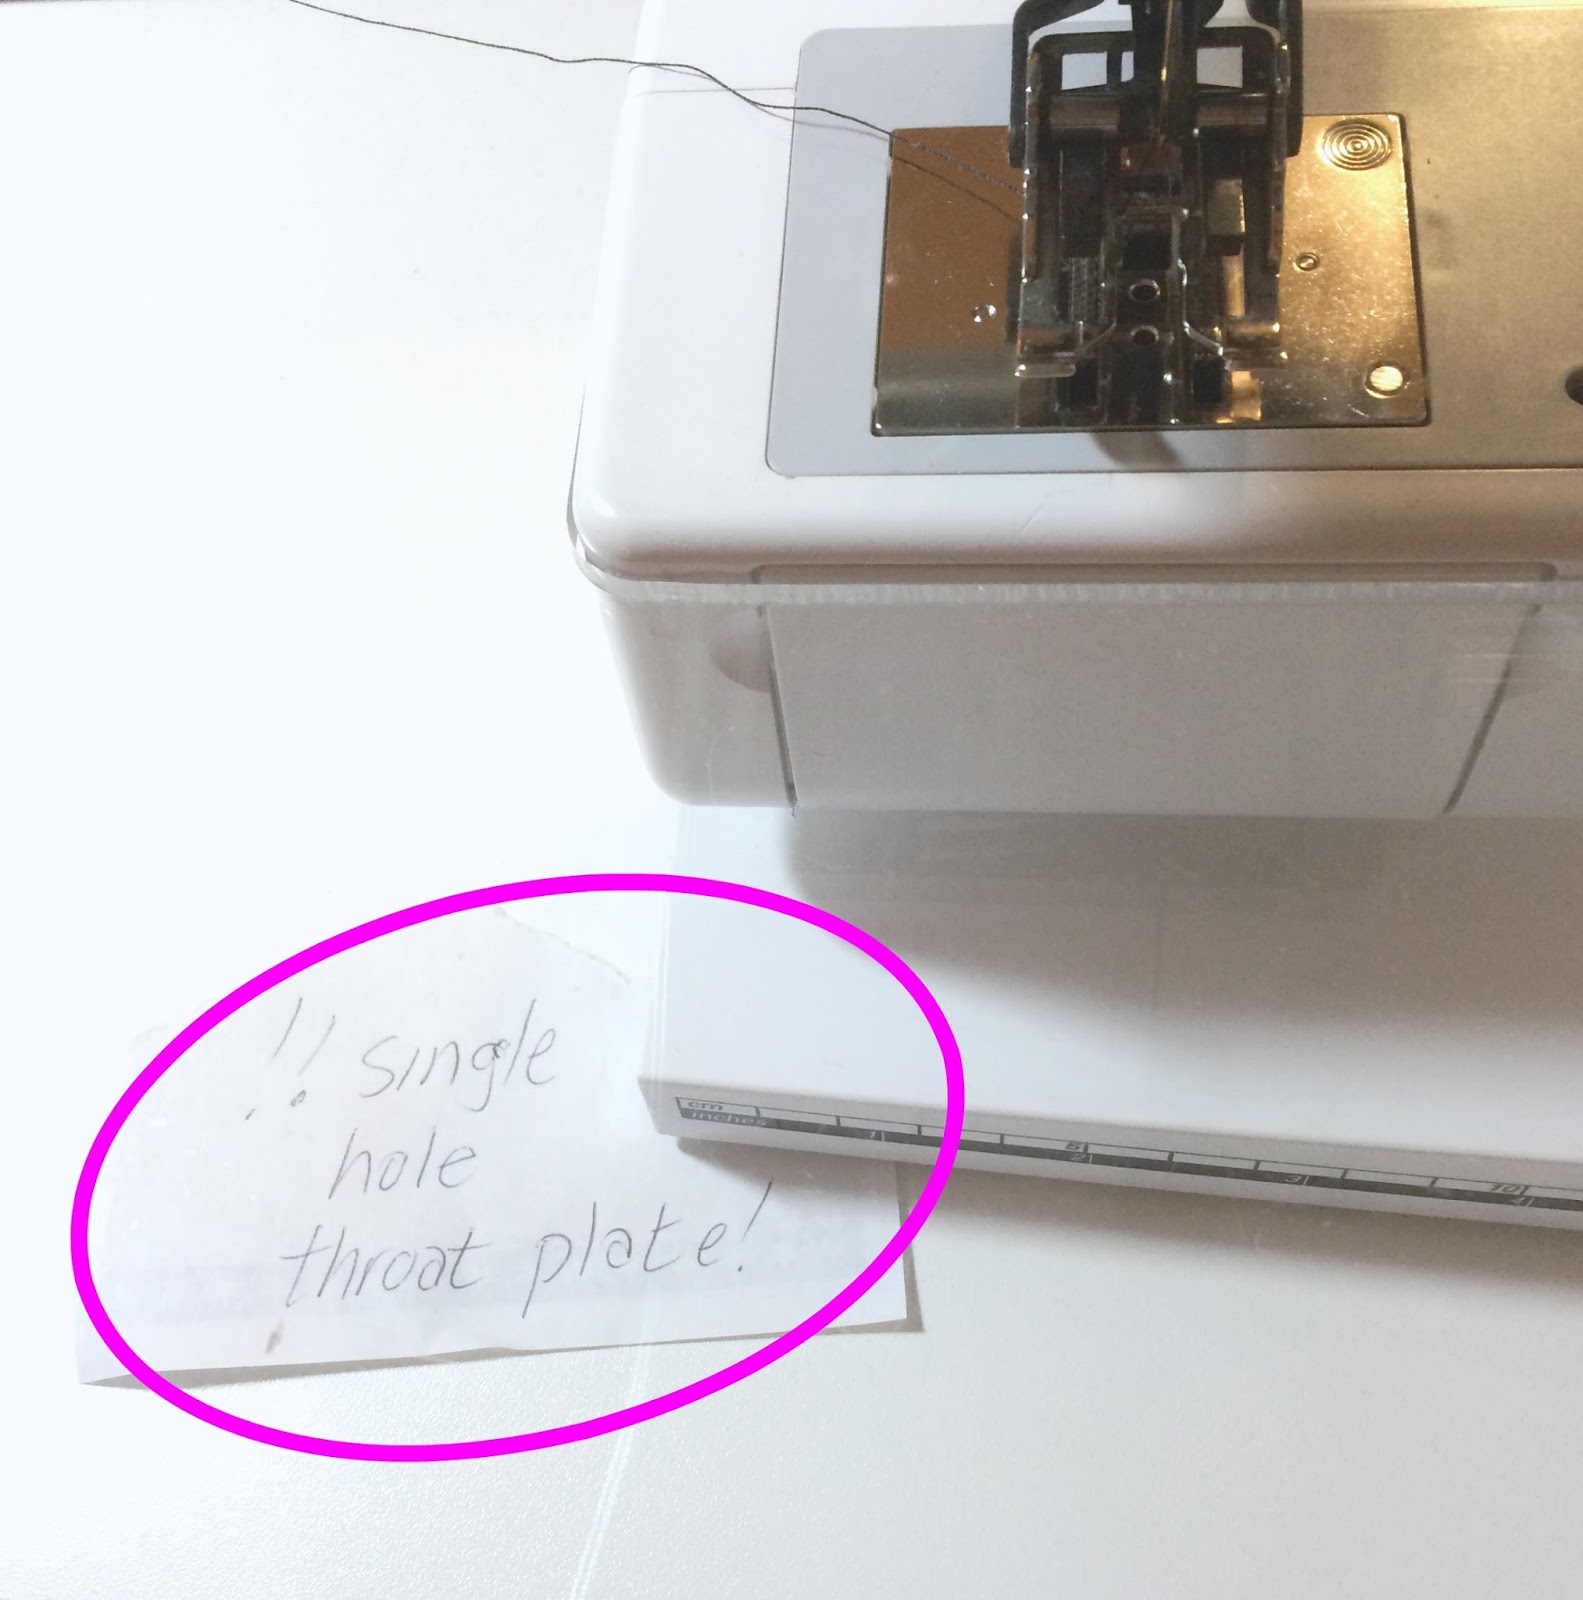
Another way to address these kind of situations is a visual queue. I bought a single hole throat plate and I'm very happy with it. However, when I forget I'm using it and switch my machine to zig zig WHAM! that needle will break faster than the fastest thing you can think of.  So I went with the visual queue: I put the little sign under my machine but I can see it through the acrylic table. I hate to say it's 'idiot proof' but so far so good!


Monday, August 22, 2016

Bitten by the Hexie Bug

I like so many other innocent quilters have been bitten by the hexie bug. I know I'm not alone...I've seen others...there's an outbreak on Instagram and Pinterest. We can't help ourselves. The darned things are fun to work on and they're easily transportable.

 
For me it started with an innocent glance and then a continuous stare at Millefiori quilts. The color and movement was absolutely breathtaking. This led to  Hatja Marek's book, The New Hexagon. Her hexies are not your ordinary English paper pieced hexagon; oh, no, they're so much more than that. They're multi-faceted and extremely interesting.


This is the point where the fever set in. I pulled my favorite colors from my stash, bought the paper patterns and started working. And work I did - I was a person obsessed. Every evening when I got home from work, I couldn't wait to start putting the little puzzle pieces together. 

"Rosette 1" was my goal and I got it done fairly quickly. But what to do with it? It's approximately 36" high and 36" wide. I'd like a wall hanging, so what I need to do is applique the piece onto another fabric. I so don't want to do that. I'm afraid it'll wiggle and shift as I try to applique around the circumference. 


That's when I remembered another technique I learned years ago for applique.It's from Mastering Machine Applique - Mock Hand Applique and Other Techniques by Harriet Hargrave. Basically what you do is a blind stitch around the piece to be appliqued. On my Bernina, I used  a stitch width of .75, shortened the stitch length, loosened the tension, used monofiliment thread, and a fine thread in the bobbin. It worked like a charm. 


Here's the back and you can barely see the stitches by my well-manicured finger nail.

  
Next step will be to quilt it. I think I'm going to quilt a hexagon shape in the blank space around the piece, but still not so sure about how to quilt the rosette. I think I'll take the Scarlett O'Hara approach "I'll think about that tomorrow"!


Saturday, April 30, 2016

My Gabby Bag


This year I joined the Bag of the Month Club ( or bagomc.com as it's known). It's a great club that provides a new bag pattern every month by some fabulous bag designers that include Betz White, Mrs. H, Sew Sweetness (Sara Lawson) and Emmaline Bags (Janelle MacKay).

The first of each month is met with anticipation for the pattern that'll be in my email box.In April it was the Gabby Bag by Emmaline Bags. I loved it as soon as I saw it. My first thought was 'what do I have in my stash that'll work?'. Being the Alison Glass frabricaholic that I am, I was immediately drawn to her Sphere fabric (which of course I own just about the entire collection).


But which ones to choose? They're all fabulous but the Vanilla and Pewter really grabbed my eye. Oh, and where those colors meet, some piping would be a-w-e-s-o-m-e! Ruby would be ideal; both for the piping and lining. Yesssss!


So along with the fabric, I needed interfacing, Soft & Stable, zippers,metal rings, and thread (but thread wasn't an issue - I have the Alison Glass Essential Thread Collection of course!). And score one for me...I had everything I need! It's realizations like this that make it all worthwhile to have a stash! I'm also proud to say that one of the zippers and the metal rings were salvaged from other bags.


Inside the bag there's a nice double slip pocket and zipper. I have to say that the directions for the internal zipper were about the best I've ever seen. Worked great!


 I was very happy with the outcome. Here's the final result. The pattern has an external zippered pocket which I didn't want - that's the nice thing about making your own bags...you can customize them so they are exactly as you want.

 
Now just need to decide if I want to make another before I see next month's pattern!

Thursday, January 28, 2016

Prepping for QuiltCon


QuiltCon is less than a month away! Five of us from my Magpie group are going and one even has a quilt in the show which is amazing!


For two of us, this will be our third QuiltCon. Since I'm all about tote bags these days, I wanted to design something fun to take along.


 At the first Con in Austin, we got the tote bags that were huge and long (but of course we needed one!). I looked mine over and decided to dissect it. I cut a big piece to use on the front. I ironed on some Wonder Under and adhered it like raw edge applique. Then it was cropped a bit as I measured it carefully and sewed it onto a fun green linen cotton blend which has great body.


I also embellished it with a vertical strip that mimics the Alison Glass fabric I wanted to use as the lining. Then I did some straight line quilting.


I cut another piece to use on the back. I was able to keep the finished edge at the top and made a great pocket. Next I went to my printer and copied my ticket stubs and ID from the first and second QuiltCon onto fabric so I could use them to embellish the bag.


I wasn't quite sure what to do about the handles...I have some awesome leather straps I got at Sew to Speak, but wasn't sure if I wanted to use them for this project. Then I saw a photo of a bag that used two different fabrics for the straps. I knew right then that was what I wanted to do. The tote's straps have the green linen on one side and the lining fabric on the other. 


Voila! I love it and I'm ready for QuiltCon!


Thursday, July 2, 2015

Working Smart

I'm still working on the baby quilt for Natalie. Bottomline, I bought too much fabric (awwww, too bad; right?!). So I am using the opportunity to try a fun technique that Nicole showed us at our Sew In last fall. Now I know she found it on the web somewhere, but I'm not sure who the sly sewist is that figured this out,but I think you'll agree it's slick.

It's all about half square triangles...Take your two fabrics and place them right side together. Then there's a little math: the size of the block x2+1. So, my blocks for Natalie's quilt are 6.5" squares, here's the calculation (don't squirm if you're math-a- phobic; it's not that hard): 6.5x2=13  13+1=14. That means I cut 14" squares. 

So, draw the "X" like usual and stitch 1/4" on either side of the lines.  Now here's the cool part: you get EIGHT half square triangles with this method.


Next (and this is the Ah Ha! moment) cut on the line like usual and in between:


This is what you end up with (told you it was pretty cool):


With a very minimal amount of trimming, here's the finished product:


Now as you may recall, I mentioned that I bought too much fabric. With this particular block ( blue stripe and white), I only needed one. But the new technique is so fun that I have 7 extra blocks. What to do with them, you ask? My husband has a client who is an going to be a new dad in May, so...I can use them on that baby quilt too. Some things just happen for a reason, don't you think?

Wednesday, June 24, 2015

Importance of Functional Design

This week I was invited to speak at the Westerville Quilt Guild.  The topic was Sewing Space Savvy...an extension of an article I wrote for NQA's The Quilting Quarterly on ergonomics.

I had the opportunity to share information that I had found, but not able to put in a two page article. Some of the information I picked up apply to office spaces as well as sewing rooms. Here are some of the tips I found out while doing research for the article:

  • Cutting table surface should be six inches down from your elbow. If you find that your cutting table isn't high enough, there are a number of ways to raise it to a better height including bricks, wood blocks, and bed risers. Here are some bed risers that have a power strip built in. How cool is that?!

  • Good lighting is important at any workspace. The Bendable Bright Light attaches to the side of your machine and can shine a bright beam right down onto the foot and stitches. And since the light is on a bendable goose neck, if you need to do some hand stitching or (gasp!) rip out, you can move the light so it's shining right down on your work.


Posture is so important when you sew. It can mean the difference between an enjoyable experience and an uncomfortable one. Ideally, your elbows and knees should be bent at 90 degree angles. 

If the chair you're using doesn't allow you to sit properly, there are a few products on the market that can help. First is the Gypsy Sit Upon. It can help you sit erect and raise your seat a few inches:


There is also a portable attachment you can purchase for better lumbar support. It attaches to your chair via an elastic strap that clips in the back. You can find these attachments in office supply stores. There are many other options on the market as well. This one I know from experience is great!

One last point I'd like to share is how important it is to take a break when you sew. Using the Pomodoro Technique, you sew for 25 minutes uninterrupted and then take a 5 minute micro-break. It's important for a number of reasons: it keeps your mind fresh and focused as well as the opportunity to stretch your legs and get the blood pumping. Sitting for extended periods of time can lead to carpal tunnel and cardio vascular disease - even if you work out on a daily basis!

These are some products that can help keep your sewing space comfortable because quilting doesn't have to be a pain in the neck!

Thursday, June 18, 2015

The Quest Continues

This year I am going to continue on my journey to improve the precision of my sewing. And it is a journey; not just a short trip. I'm showing progress so I know I am trainable (just ask my dogs; they got me whipped into shape in no time!), but I need to keep working at it. As Mad Eye Moody said in the Harry Potter books: 'be constantly vigilant'. 

There are the very apparent tips like keep the blades in the rotary cutters sharp and use Machingers by Quilters Touch when working on a larger piece (really helped reduce the tension in my arms and shoulders). Oh, and here's one of my favorites: if I make a mistake, fix it. Chances are if I think no one will notice I'll be in the home stretch when I realize that that decision was so very wrong. And (speaking from experience), then I get very discouraged and sometimes don't want to finish the piece.

I've invested several tools too. This post is about a few things I've picked up along the way that have worked for me...

1. Listen to Susan S. Cleveland. Her website is Pieces be With You. She is an engineer turned quilter and precision is her thing. Take one look at the name of one of her books to see this is true. It's a great reference book that every quilter should own.


One of the things I found very interesting is what she wrote about regarding the feed dogs and presser foot. On most machines, when the presser foot is down, you don't get the entire use of the feed dogs which, may I remind you, are there to move the fabric under the needle. The center position is the one she uses the least on her machines (interesting, don't you think?).


2. "Scant Quarter Inch". Does this mean a smidge under .25"? Or just a 'thread or two under a quarter inch'. Here's what Susan has to say about it: When seam allowances are pressed to one side, one fabric folds back on itself and up over the thread. The amount of fabric taken up in the fold is the "turn of the cloth". If strips are cut perfectly, then a perfect 1/4" seam allowance would yield a result too small because some fabric is taken up in the turn of the cloth. So the seam allowance must be a scant 1/4"."

So what I did was get  the Prep-Tool by Guidelines 4 Quilting. It has a guide that I placed under my presser foot and then there is a reusable adhesive seam guide that attached to my machine. Then removed the plastic guide and I was good to go. I have only had it a couple days, but so far so good.


My favorite tool is my TrueCut ruler and rotary cutter by The Grace Company


The ruler has a couple helpful features: every inch, there is a vertical opening in the ruler that lets me line up with my cutting mat and/or fabric design to keep the ruler straight.  There is also a lip on either side. This raised part of the ruler allows the TruCut rotary cutter to hook onto it. Now every time I cut, it's a true straight line. No more veering over to the right or left. And this keeps the ruler from slipping because my entire focus is on pressing down on the blade rather than over to the edge of the ruler.


As I continue on my journey I'll pick up more tips along the way. I'm sure there are other travelers on this road, so I'll be sure to share what I learn from them as well!

Thursday, June 11, 2015

Name Tag Design

When you wake up early in the morning and the house is quiet because it's too early for anyone to get up, what crosses your mind? Well, for me this morning it was my quilt guild name tag. Weird, eh? I don't know why I thought of that but the point is that I did.

I had a really cute name tag at one point.  I had made it out of fabric in yellow and black. But for the life of me I can't find it. I've looked high. I've looked low. No luck. So I need a new one. 

The next place my mind started to go was to a class I'd just taken on needle felting. I've written a post on felting before, but finally I had the opportunity to take a class and learn some new ideas.

One of the things we did was use wool roving. These fibers are used to make actual wool felt. Here's  what it looks like:


All you need to do is unwind a little and then gently pull it apart.


 Next, layer it three or four times; vertical, horizontal, vertical, horizontal. Now it's ready to felt. I alternated blue and green.


The needles of the felting tool are barbed so it pulls actual bits of the wool up and down through the piece. That's what causes it to become sturdy and felt. You can also felt without a machine. You just need a felting punch tool which contains the needles and a punch mat. It can provide the same end product as the machine punch tool, but it will take quite a bit longer to complete a project.

In class we learned to use a wooden skewer to direct the loose bits on the edges up under the needles. Not only does it keep fingers away from the nasty needles, but if the skewer get's  nicked, you're less likely to break a needle than you would be if a metal tool was used. 

So the needles go up and down; condensing the fibers. Then flip it over, felt it some more. Flip, felt, flip, felt etc. etc. etc.


  Here's the final piece:


Next I cut it into a shape, embellish a bit, add my name, and voila! a new name tag. The process doesn't really take a lot of time and it's really a fun break from sewing with thread.


Sure hope I don't lose this one!