Sunday, September 29, 2013

Hand Sewing Binding

It's finally time to add the binding to Abby's quilt. Typically I machine stitch the binding to the quilt, turn and then hand stitch. For a long time I used pins to hold the binding in place. Can you see the accident ready to happen in this photo?

Yes, as you can imagine, I got stabbed with more than my share of pins using this technique.

Then I found out about the clips that can be used for the same purpose AND (better yet) they are pain free.
 
 
If you haven't given them a try, I think you should. Your fingers will love you for it!

Wednesday, September 25, 2013

Quilt Label

I'm not the best when it comes to putting a label on my quilts. But this one for Abby is going to be different.  I've always enjoyed drawing letters in different ways; big, bold, lower case, upper case; everything. My friend Ellen and I used to do it all the time when we were in junior high, so I guess that's how I got my start. 

So now that it's time to make a label for Abby's quilt, I started to doodle. Then I had the brainstorm that I wanted to put her initials in a monogram format... you know, the last initial is larger and over the first and middle initials.


Okay, I have the idea but how to implement it is the question. I'm pretty good at machine applique if I say so myself so that's probably how I'll go. Ohhh, then I had an idea...what about reverse applique? I showed samples to hubby and he liked the reverse applique better. He thought the letters stood out better.


So a sewing I go!


Now, since the front of the quilt made of rectangles, I wanted a circle shape for the label itself.


Now I think I should kick myself. I couldn't wait to use a new ruler I got to cut circles so I went ahead and cut it out...but I didn't machine applique a message on it and that was part of the master plan. 

Okay I had to let it perculate. That's the way I work; I get idea and then have to let it simmer in my brain until the light bulb clicks on. This time when it turned on I saw Plan B. What was that plan, you ask? Why it was to free form stitch the message. I have some nice heavy blue thread and I've done that technique successfully before. So here's the final label. Can't wait to put it on the finished product!


Sunday, September 22, 2013

Holiday Planning Time is Here!


I know it's September. But I have to say that when I went into one of the big box stores, I was surprised to see Christmas merchandise already! But then, my crafter gene took over and reminded me that for those of us that make gifts for Christmas need to plan ahead.

There is a really pretty Christmas quilt on the Fat Quarter Shop blog that I want to share this week. It's called Deck-ade the Halls Quilt Along. You can see the different holiday motifs available such as ornaments, wrapped packages, and stockings. And to make it extra easy, there's a video available for each of the blocks.   If you're not up to making the whole thing as a quilt, there are other possibilities: pillows, wall hangings, and table runners come to mind. 

Check it out; I'm sure you'll be glad you did!

Wednesday, September 18, 2013

Book Report: Bead Embroidery Stitch Samples

Earlier this year I was wrapping up an art quilt and wanted to add some hand embroidery. I know the basic stitches, but I wanted something new...something with pizzazz.

Have you ever googled "hand embroidery"? Believe it or not, the outcome is pretty dismal. Just the basics, and those I already know.

Next step was to peruse the books that are available (twist my arm!). That's when I happened upon Bead Embroidery Stitch Samples by Yasuko Endo. It mixes embroidery ( #1 on my list) with beading (the pizzazz factor).


It's a great book. The first several pages address different embroidery threads, types of beads etc. as well as marking and tracing a design. This is key for me because it helps me keep my stitches uniform and straight.


The majority of the book contains what I call the "nitty gritty".  Photos of finished stitches on the left hand page and on the right are the actual steps I need to follow to get those great stitches. And it's outlined stitch by stitch.

The Magpie Quilters is having a block exchange to give us the opportunity to show off some of our hand sewing and embellishment skills. I'm sure I'll be referring to this book as I work on my blocks for the swap. Hopefully my blocks with ooze with pizzazz!

Sunday, September 15, 2013

Iron Envy

This post is about my iron envy. Yes, I can admit to being green with envy. Here's what happened...

My friend Sheila told us at a Magpie Quilters meeting that she had a cordless iron. I could just picture it; when I needed to press a big quilt ready to be quilted, I wouldn't have to calculate the length of the cord and distance from the electrical outlet. I could iron a quilt block without having the cord for the iron catching on the corner and wrinkling all of my meticulously pressed work.Why hadn't anyone thought of it sooner?? 

I told myself that whenever the time came for me to pitch my old iron; I would get a cordless.  Then one day it happened...I realized that the cord was fraying and water was leaking ( I swear I didn't destroy it so I could get a new iron) (I wouldn't do that kind of thing!). Finally the time had come.

I did my research. There are a couple companies that make them. But when I read the reviews, it was apparent they were not all created equal. Some of the bases were smaller and it meant that I would have to be a bit more careful and aware of how I sat it on the base.

I made the decision and went with a Panasonic and I love it as much as I hoped. I holds the heat for a minute or two before I have to put it back in the base which is really quite fine with me.


So if you're in the market for a new iron, I highly recommend the cordless. You'll thank me later!

Wednesday, September 11, 2013

Sewing on a Plane

Sewing on a plane. Good idea or bad idea? Well, I thought I'd give it a try and see how it went. We were flying to Western Canada so I figured I'd have a set amount of uninterrupted time (other than a flight assistant asking me is I'd like something to drink, that is) (wouldn't mind interruptions like that at home, though) so why not try to take advantage of it.

In one of my little cosmetic bags I had my English Paper Piecing project; fabric cut with tiny paper shapes, thread, a couple needles, and thread snippers. First question was; would I make through security? Answer is Yes. No on questioned me about the contents. (I did have a friend once that had her eyebrow tweezers confiscated. We could never figure out why that was...did they think she'd groom someone to death??)

Once we took off and I read the Sky Mall magazine. That lasted about 20 minutes. Then it was time to see if I could get everything out without dropping anything...you see, I was in the middle seat. Voila! It was all out and my lap table was down and in position. I spread everything out with the overhead light on. Which I must say gave pretty darned good light.


Long story short, I only almost stabbed the woman next to me once. Moral of the story is not to work with a really long thread. My habit is to try to use a long thread so that I don't have to rethread the needle as often. However, that means that I pull up and to the right, but there was someone sitting on that side of me. Luckily she was sound asleep so there were no words exchanged or confiscation of my sewing.

Was this a good use of my time? All I'll say is that I sure thought that in 4+ hours I'd get a heck of a lot more done than this. So how long, I wonder will it take me to get the pillow done?

Sunday, September 8, 2013

Proper Folding Makes a Difference

I'm really working on my precision. I'm slowing down, taking my time, and trying new techniques. In Quilts Made Modern by Weeks Ringle and Bill Kerr, Weeks says "In quilting, small errors have a way of multiplying, leading to bigger problems.  It all begins with cutting..."

And I'm finding that to be very true (well, who am I to contradict Weeks, but I mean it; she is right). This tip is about folding the fabric with the straight of grain to get a nice precise strip. Quite often I'd have unintentional wonky strips and had no idea why because I cut them the right length and width.

Here's the story...I was in the habit of folding the fabric straight across the selvages:


Sometimes I'd have a wave, but I'd just smooth it out. Turns out that some of my strips would have bias in them and ultimately would not provide a truly straight strip.

What I've learned from Abbe (thanks Abbe!) is that that approach is wrong. The straight of grain should dictate how the fabric is folded; not the salvage. Look at the difference:


Also, the grain that goes the length of the fabric (the warp) is less likely to stretch. That means that if you're going to cut long strips e.g., for a border, you want to cut it along the warp rather than crosswise (the weft). Give it a try; pull on the length of your fabric and then the width. The width will have more give...honest!

Hope you like this idea. Any tip that makes it easier to complete a project is a tip worth sharing!

Wednesday, September 4, 2013

Abby's Quilt Chapter 1

With a master's degree in Photography, my friend Abby is moving from Central Ohio to Vancouver. She is about to begin a very exciting time in her life and I'm very happy for her.  For those who are visual, she's moving from Point A to Point B (for those of us who miss her, I'll just say it seems much further).

 
Before she left, Abby asked me if I'd make her a quilt. Needless to say I was thrilled and said absolutely. I sent her some ideas for the queen size quilt; they were all modern since I was fairly certain that would be her preference.  She picked an easy design that I knew I could handle. Now onto fabric...
 
Along with Abby, her mom, and aunt we hit a couple of my favorite quilt shops; Sew to Speak and Quilt Trends. Abby decided she wanted to go with a greyish blue color scheme.  We bought a piece of one of the new modern solids - the ones where two threads are combined to give an cool effect to the fabric. She also picked out a nice batik for the sashing. That gave me a good starting point for the whole quilt.  A couple weeks later I went to Quilt Beginnings where I found a nice selection of the fabrics and I was able to get everything I needed. Here's what I ended up with:
 

I think Abby will like these. All in the same hue and tone.

Then I cut out the pieces and started to sew...

And sew (love that chain piecing technique; don't you?)...


Then I clipped the chains apart (kind of makes me understand why when I started to quilt my dad said 'you mean you cut the material into pieces and then sew it back together again?')...


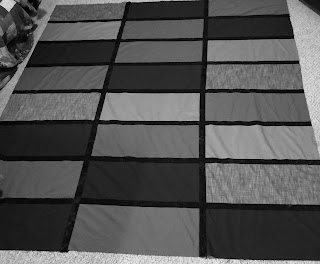
Finally I added the sashing and  voila! the top was pieced. It's shown here in black and white in case Abby reads this post!
 

Now I need to think about the back...I'll save that for Chapter 2 in the tale of Abby's quilt! (That should buy me some time to figure it out!)


Sunday, September 1, 2013

The Pre-wash Nest Conundrum

Pre-wash or not pre-wash; it's a touchy question.

Most quilters have a very strong opinion about it. Those who don't pre-wash like that little bit of sizing that's in the fabric. And people who primarily make wall hangings, like Susan K. Cleveland, know they'll be making art that won't be washed, so use it straight off the bolt.

I on the other hand, fall into the pre-wash camp. I figure that if the fabric is going to shrink, I'd like to know that before I spend my time sewing the piece. However (you know there's always a catch), when I pre-wash, it get these dreadful thread nests.

It looks kind of pretty, but when you have to stand there with scissors cutting it all apart, it can be a real pain. I read somewhere that if you just clip off a corner from the fabric, you'll be nest free. Before you try that; take if from me that it's one of those things that sound too good to be true and thus does not work.

Now we get to my brilliant friend Abbe from book club. Oops! We don't call ourselves 'book club' any more, we're the Magpie Quilters (magpies like things that are shiny and are hoarders - while we consider ourselves "collectors" rather than "hoarders", it's just really semantics isn't it?). Sorry, I digress...back to Abbe; she told us at our last meeting that if you use pinking shears (like the ones your friend Sally may have given you) (well, she gave them to me; not so sure about you) (did I just re-digress??) on the raw edges i.e., not the selvages, you won't get the dreaded thread nest.

As you can see; it worked!! I can live with those few stray threads. I was so happy with the results that I wanted to share. Give it a try and see what you think.

Hope you like this idea. Any tip that makes it easier to complete a project is a tip worth sharing!